Artificial Intelligence has made significant strides in recent years with sophisticated Generative AI models capable of performing tasks that seem almost magical, at least for non-techies. From knowledgeable chatbots that talk like humans to tools that generate images based on text inputs, the advancements in generative AI have astonished us all. In this blog, we’ll learn about the Stable Diffusion generative model with an example of building a logo generator app.
What is Stable Diffusion?
Stable diffusion is a text-to-image generative model that generates photorealistic images from text inputs. It can generate accurate results as it is pre-trained on large datasets of text-image pairs. The model combines the power of diffusion-based generative models and natural language processing to capture complex relationships between textual and visual data. Technically,
- It is a latent text-to-image diffusion model.
- It generates images by iteratively applying a stochastic diffusion to a noise vector.
The best part about Stable diffusion is that it is open-source, and its code is publicly available for anyone to use, modify and distribute without restriction. So, if you plan to use text-to-image features in your product, Stable diffusion can be a cost-effective alternative compared to Dalle-2 from OpenAI.
The requirement
Generating images from text inputs sounds cool, right? You can think of numerous use cases and applications for this model. Let’s build an application, say, a logo generator app. In the process, we’ll learn how the model works. The requirements for the app are;
- Users should provide text input for how they want the logo to look.
- The app will return a logo image as output. The image has to be as defined in the input prompt.
We need to choose a text-to-image generative model to meet the above requirements. Stable Diffusion is our choice. First, to understand how it works, let’s familiarise ourselves with diffusion and diffusion models.
What is a Diffusion Model?
In physics, diffusion is the process of particles spreading from a high-concentration area to a low-concentration area by random motion. Diffusion models are generative models that work similarly to the diffusion process. The model starts diffusion with a noisy input signal and then gradually refines the noise over time to generate the output signal.

Many diffusion models are available in the market, architected to perform different tasks, such as restoring degraded images, smoothening images, etc. The table below lists some diffusion models and the tasks. Since our requirement is to build a logo generator app, we can choose the Latent Diffusion model that can perform image generation tasks.
| Model | Task |
| Dynamic Diffusion | Natural language processing |
| Cascaded Diffusion | Restore degraded images |
| Anisotropic diffusion | Smoothen images |
| Perceptual Diffusion | High-quality images from low-resolution |
| Score-Based Diffusion | Generative modeling, Video Generation |
| Variational Diffusion | Image and video processing |
| Latent Diffusion | Image generation, text generation |
Latent Diffusion Model
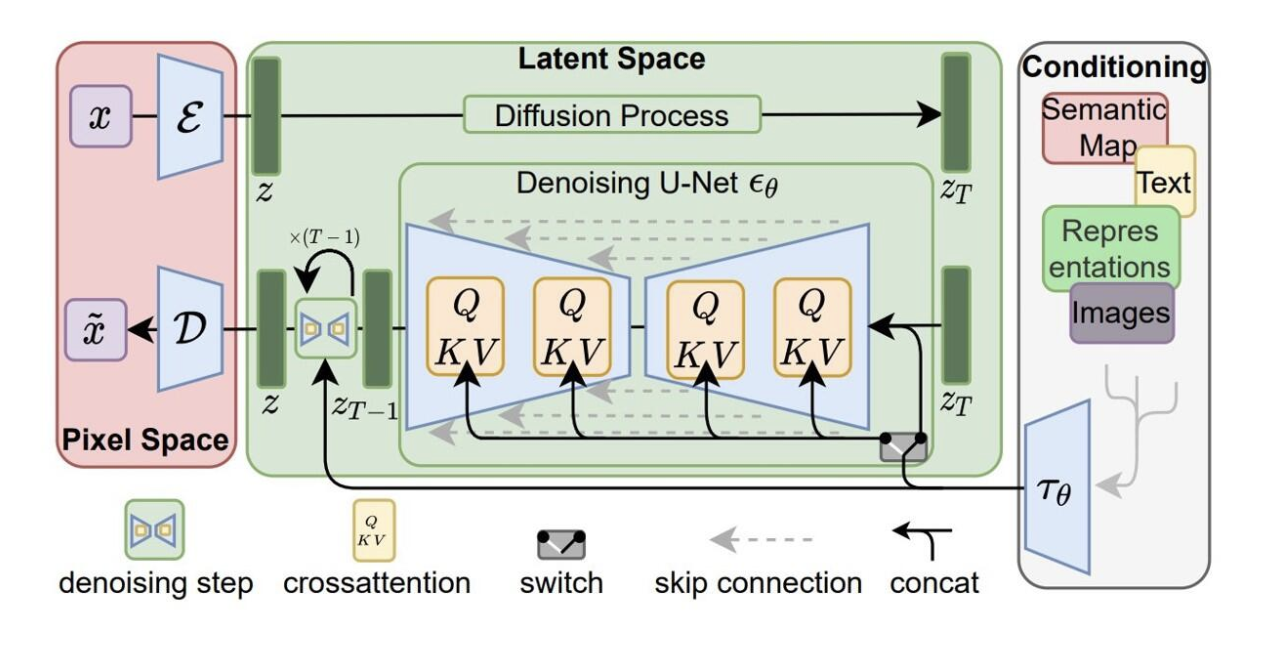
Stable Diffusion is a latent text-to-image diffusion model. The model has 3 three main components. Each component has its own neural network. The first component, ClipText is the text encoder. It is used for encoding the input text. For example, if a user inputs a prompt “create a logo with a red circle and a lion in the center.” ClipText will encode this prompt and feed it to the next component, which deals with image generation.
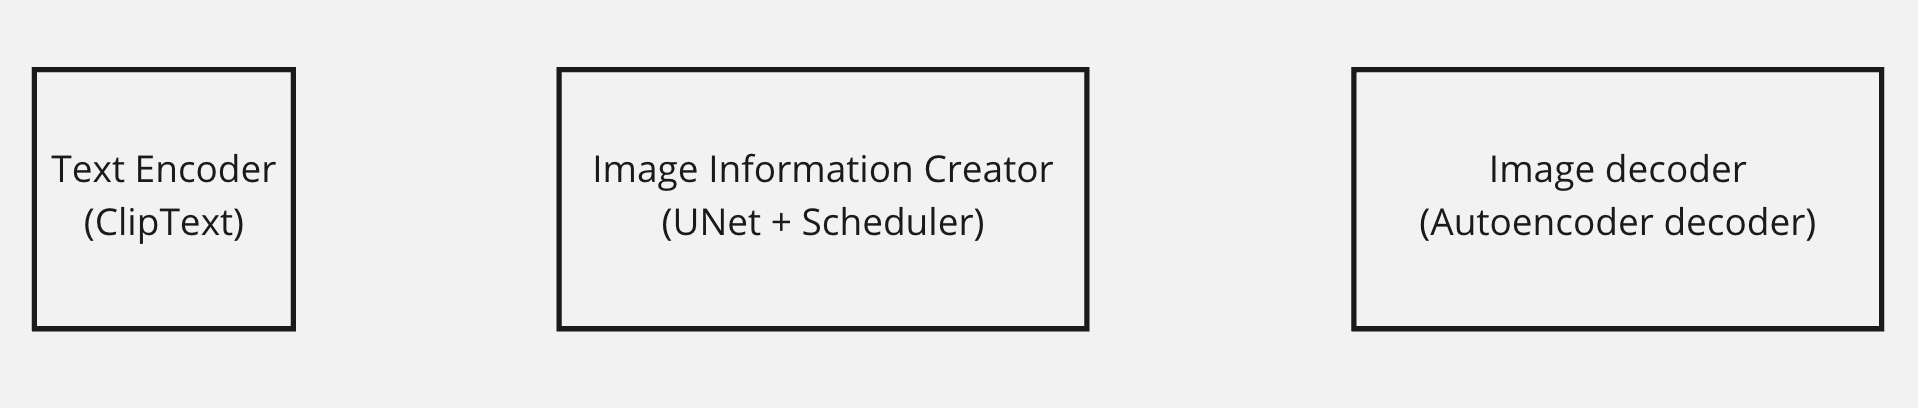
The second component is the image information creator. It is a combination of Unet and a scheduler. The diffusion process that generates the image happens inside this component. This component creates a processed information array, the final information required to create the output. For example, this component creates an array representing “a red circle and a lion in the center.” The third component, Autoencoder Decoder, is the image decoder that decodes the processed information array and outputs the final generated image, the logo with a red circle and a lion in the center. A detailed diagram of the three components of Stable Diffusion is shown below.
But how was the logo image generated?
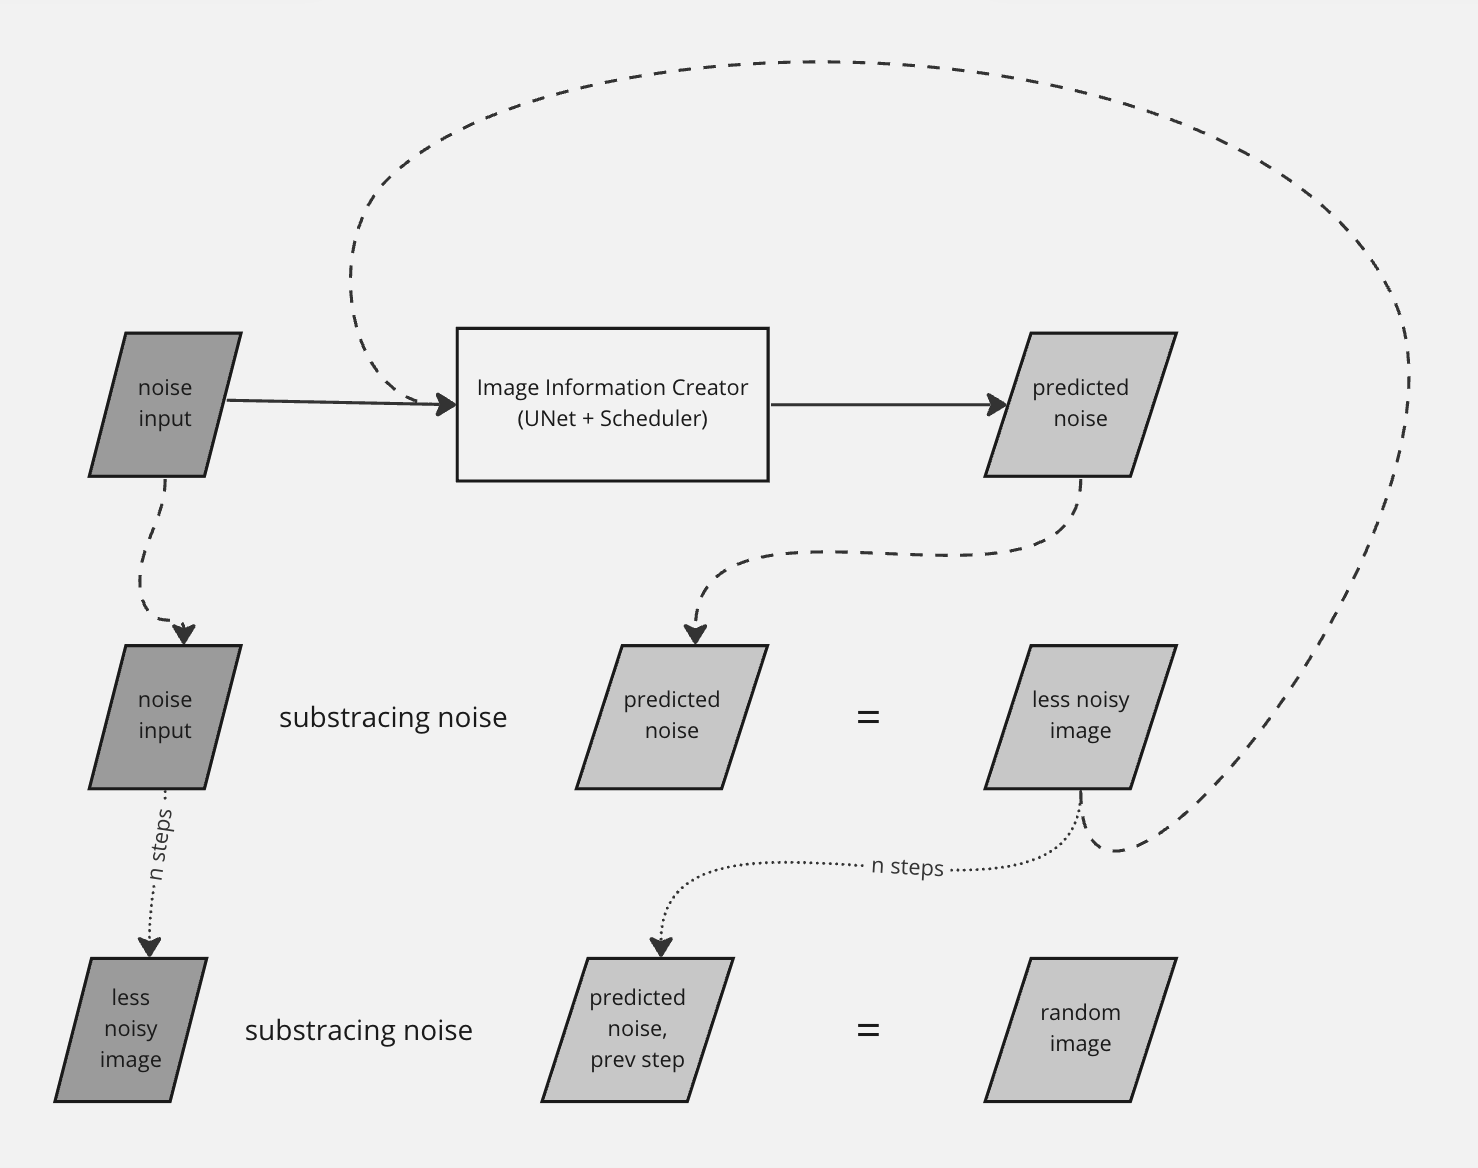
What happens inside the image information creator is the mysterious process that generates the image from the input text prompt. Let’s demystify Diffusion, the process that happens inside the image information creator.
- ClipText encodes the prompt into token embeddings representing the input text.
- Input text token embedding and a random starting image (noise image) are given as inputs to the image information creator.
- With these inputs, UNet produces an information array using the diffusion process.
- The image decoder uses the information array to paint the final image.
- The diffusion process happens in a step-by-step fashion.
A quick look inside UNet,
Knowing how the UNet neural network was trained is important to understand the diffusion process. The high-level steps go like this;
- The neural network is trained with a huge dataset of images with varying noise levels.
- The task of the network is to predict the noise level in an input image.
- The predicted noise level of a training example is compared with the labeled noise value to calculate the loss.
- The model is updated with backpropagation.
- After training, this model becomes an excellent noise predictor. It takes in a noisy image and predicts its noise level.
- Once the noise level of a noisy image is predicted, the model can subtract the noise from the input image to slightly denoise it.
At this point, if you input a random noise image into the model, the model executes a series of noise addition and denoising processes and generates a sensible image as output. This generated image will be based on the image dataset the neural network was originally trained on. We do not have any control over image generation. But that’s not what we want. We want a logo image with certain specifications. Going back to the input prompt part.
As said earlier, ClipText converts the prompt into text embeddings. CLIP is a combination of an image encoder and a text encoder. So, after training CLIP with a large dataset, its encoders will be able to produce embeddings where an image of a lion and the sentence “a picture of a lion” are similar. This is the starting point of our demystification.
Text to Image
So far, we have discovered two processes. One is the generation process of the random images as output by UNet. The second process makes the embeddings of an image and text similar. The following steps will give you an idea of how an image is generated from the input text prompt;
- UNet takes text embeddings, a random noise image, and noise value as inputs.
- The attention layer inside UNet enables it to process text embeddings (text conditioning).
- The attention layer merges the text embeddings in the noisy, compressed image latents.
- Step by step, with each denoising, the noise in the image will be denoised with respect to the text embedding.
- Since the text embedding and image it represents are similar, the denoised output from UNet will have components as specified in the input prompts.
- The decoder decodes this array and paints an image.
I hope you now better understand how Stable Diffusion generates images from text prompts.
Building a Logo Generator App using Stable Diffusion
Building a logo generator app using Stable Diffusion can be a fun and rewarding project for anyone interested in exploring the capabilities of artificial intelligence models. The key steps are;
- Install Anaconda Python distribution.
- Create a dataset of logos and typography for the generator.
- Install Stable Diffusion
pip install jax jaxlib stax optax dm-haiku dm-haiku-rl stable-baselines3
Train Stable Diffusion model
The steps to train a Stable Diffusion model are as follows;
- Data Preparation: Prepare the collected data in a format the model can understand. This involves preprocessing the data, splitting it into training and validation sets, and converting it into a suitable format such as NumPy arrays.
- Define the model architecture: Stable diffusion model consists of multiple neural network layers. You will need to define the model’s architecture by specifying the number of layers, the size of each layer, and the activation functions to be used. This can be done using the Haiku library, which provides a high-level interface for building neural networks. The code below defines a function make_model that takes the number of layers and hidden size as inputs and returns a callable object forward representing the model architecture.
import haiku as hk
import jax.numpy as jnp

def make_model(num_layers, hidden_size):
    def forward(x):
        for i in range(num_layers):
            x = hk.Linear(hidden_size)(x)
            x = jax.nn.relu(x)
        return x
    return forward
- Choose the hyperparameters: Hyperparameters control the training process, learning rate, batch size, and the number of epochs. You can choose appropriate hyperparameters based on your data’s characteristics and the model’s desired performance.
learning_rate = 1e-3
batch_size = 32
num_epochs = 10
- Define the loss function: Loss function measures the model’s performance on the training data. For stable diffusion models, the loss function is typically the negative log-likelihood of the data. This can be defined using the optax library, which provides a collection of optimization functions and utilities. Below is a code for defining the loss function. The function
loss_fnthat takes the model and a batch of data as inputs and returns the loss value.
import optax

def loss_fn(model, batch):
    logits = model(batch)
    log_probs = jax.nn.log_softmax(logits)
    loss = -jnp.mean(log_probs)
    return loss

optimizer = optax.adam(learning_rate)
6. Train the model: To train the model, you need to loop over the training data, compute the loss and gradients, and update the model parameters using the optimizer.
import jax

model = hk.transform(make_model)(input_shape)
opt_state = optimizer.init(model.params)
for epoch in range(num_epochs):
    for batch in data_loader:
        loss, grads = jax.value_and_grad(loss_fn)(model, batch)
        updates, opt_state = optimizer.update(grads, opt_state)
        model = model.apply(updates)
    print("Epoch: {}, Loss: {}".format(epoch, loss))
The above code defines a stable diffusion model using the make_model function, initializes the optimizer and model parameters, and loops over the training data to update the model parameters using the gradients computed from the loss function. After training, you have a stable diffusion model that has learned to generate logos based on the collected data. Test your trained model and integrate it with the web app once you have a stable model.
from flask import Flask, request, jsonify
import jax
import numpy as np

app = Flask(__name__)

def preprocess_input(data):
    # function that preprocesses the input data
    ...

def postprocess_output(logo):
    # function that postprocesses the generated logo
    ...

def load_model():
    # function that loads the trained model
    ...

def generate(model, data):
    # function that generates a logo using the model and input data
    ...

@app.route('/generate_logo', methods=['POST'])
def generate_logo():
    data = request.json
    model = load_model()
    input_data = preprocess_input(data)
    logo = generate(model, input_data)
    output_data = postprocess_output(logo)
    return jsonify({'logo': output_data})

if __name__ == '__main__':
    app.run()
The code above defines a Flask server with a /generate_logo endpoint that receives POST requests containing input data for generating a logo. The function load_model() loads the trained model, and the function generate() generates a logo using the loaded model and input data. The preprocess_input() and postprocess_output() functions preprocess the input data and post-process the generated logo, respectively.
The generate_logo() function calls these functions to handle the input and output formats. The generated logo is returned as a JSON response. To run the web app, simply run the Python script. The server will start running, and the /generate_logo endpoint will be available to receive requests.
Frontend
<!DOCTYPE html>
<html>
  <head>
    <meta charset="UTF-8">
    <title>Logo Generator</title>
  </head>
  <body>
    <h1>Logo Generator</h1>
    <form>
      <label for="text">Enter Text:</label>
      <input type="text" id="text" name="text"><br><br>
      <label for="color">Choose Color:</label>
      <input type="color" id="color" name="color"><br><br>
      <button type="button" onclick="generateLogo()">Generate Logo</button>
    </form>
    <br>
    <img id="logo" src="" alt="Generated Logo">

    <script>
      function generateLogo() {
        const text = document.getElementById('text').value;
        const color = document.getElementById('color').value;
        const data = {'text': text, 'color': color};

        fetch('/generate_logo', {
          method: 'POST',
          headers: {
            'Content-Type': 'application/json'
          },
          body: JSON.stringify(data)
        })
        .then(response => response.json())
        .then(data => {
          document.getElementById('logo').src = data.logo;
        });
      }
    </script>
  </body>
</html>
The code above creates a simple HTML form with input fields for text and color. The function generateLogo() is called when the user clicks the “Generate Logo” button. This function retrieves the input data and sends a POST request to the /generate_logo endpoint using the fetch() function. The response containing the generated logo is then displayed on the page.
Wrap up
Building a logo generator app using stable diffusion can be a fun and rewarding project for anyone interested in exploring the capabilities of GAI models. To further elaborate on the potential of Stable Diffusion, the concept is not limited to image processing tasks. It can be applied to various fields, such as natural language processing and computer vision.