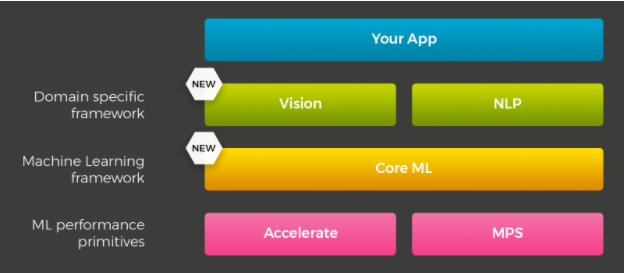

The Apple WWDC 2017 saw a host of interesting new developments for iOS enthusiasts with regards to new coding frameworks, API’s and much more. One of the key focus areas during the conference was undoubtedly the Core ML framework announced by Apple. Core ML is Apple’s official foray into the world of Machine Learning for its iOS ecosystem. For a while, there has been a concern among the tech community about Apple’s lack of enthusiasm with AI integrations on its hugely popular consumer products. But these concerns have now been answered with Core ML. Apple has claimed that Core ML works effortlessly with the existing hardware infrastructure of iOS enabled devices with minimal memory footprint and energy consumption thereby paving the way for widespread adoption in the developer community.
For iPhone and iPad users, this translates into a whole new generation of AI enabled apps they can use on their device without facing compatibility or performance issues. Core ML can be harnessed to empower apps with a number of machine learning models. These could be deep learning on a mass scale with support for over30 different types of layers, support for linear and nonlinear graphical processing models, SVM, support for tree ensembles and much more. For developers to get a better understanding of how Core ML works, we have included a sample App creation demo here with Core ML integration on iOS.
Core ML is an Apple framework which allows developers to simply and easily integrate machine learning (ML) models into apps running on Apple devices (including iOS, watchOS, macOS, and tvOS). Core ML introduces a public file format (.mlmodel) for a broad set of ML methods including deep neural networks (both convolutional and recurrent), tree ensembles with boosting, and generalized linear models. Models in this format can be directly integrated into apps through Xcode.
Get in touch with us today to explore the possibilities.
Apple introduced NSLinguisticTagger in ios 5 for Natural Language Processing (NLP).They introduced metal in ios and in 2016 apple introduced Basic Neural Network Subroutines(BNNS) to the accelerate framework, enabling the developers to construct neural networks for inferencing(not training). In 2017 Apple introduced CoreML and Vision with which you can use trained data models and easily access Apple’s models for face detecting, face landmarks, text, rectangles, barcodes, and objects. It is possible to wrap any image – analysis CoreML model in a visual model.

CORE ML MODEL is the conversion of a trained model to an Apple formatted model file (.mlmodel) that can be added to the project.
Trained data models are the resulted artifact that is created by the training process of a machine. The process of training a model involves providing a learning algorithm with training data to learn from.
We have two steps for creating an iOS app with machine learning capabilities.
To use the trained data models we need to convert it to a public file format (.mlmodel). Let us see how we can convert a trained data model into a .mlmodel format.
For converting a trained data model to .mlmodel, we use coremltools. Let us get into deep about how to install coremltools in your machine. The prerequisites for installing coremltools include installing “Python package”
pip install -U pip setuptools
On windows, OS terminal run this command.
python -m pip install -U pip setuptools
Note: Installation errors might occur in a pc with an updated python version which is higher than Python 3.4. In that case please create a virtual environment and install Python version less than 3.0 onto it and try installing the coremltools.
After Python package installation, to install “Coremltools” to the machine, run this command in terminal.
pip install -U coremltools

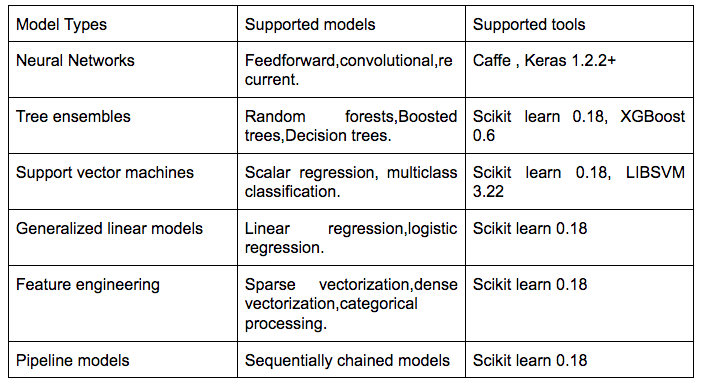
Supported third party models and tools for coremltools conversion are;

let us try converting google inception v3 caffe model to coreml mlmodel. Open a python editor and try running the below code
import coremltools
# Convert a caffe model to a classifier in Core ML

coreml_model = coremltools.converters.caffe.convert(('bvlc_googlenet.caffemodel', 'deploy.prototxt'),
predicted_feature_name='class_labels.txt')

# Save the model
coreml_model.save('BVLCObjectClassifier.mlmodel')
In this “bvlc_googlenet.caffemodel” would be the sample file which we would use for the mlmodel conversion.
After conversion process, you might need to set license, author, and metadata which will be surfaced over the Xcode UI while the input and output descriptions are surfaced as comments in the code generated by Xcode for the model consumer.
# Set model metadata
coreml_model.author = 'Manu Yash'
coreml_model.license = 'BSD'
coreml_model.short_description = 'Room occupancy API helps to predict if a room is empty or not.'

# Set feature descriptions manually
model.input_description[‘temperature’] = 'Temperature inside room'
model.input_description['humidity'] = 'Humidity inside room'
model.input_description['light'] = 'Size (in square feet)'
model.input_description['CO2'] = 'Size (in square feet)'

# Set the output descriptions
model.output_description['occupancy'] = 'Occupancy inside room'

# Save the model
model.save('PredictOccupancy.mlmodel')

After the conversion, you need to verify whether the predictions made by CoreML matches up with the source framework. Let us show you how you can verify the above with a piece of code.
import coremltools
# Load the model
model =  coremltools.models.MLModel('PredictOccupancy.mlmodel')

# Make predictions
predictions = model.predict({'bedroom': 1.0, 'bath': 1.0, 'size': 1240})

Integrate the data model to the Xcode project and start coding your app.
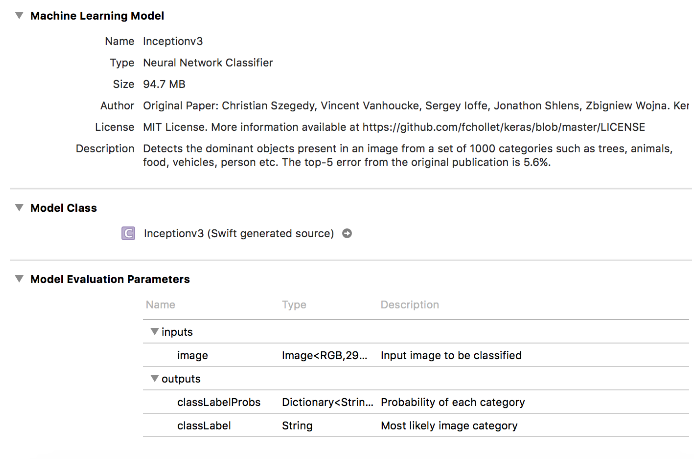
For working with CoreML as of now you need to have Xcode 9 beta. Hope Apple will be soon releasing the Xcode 9 in production. For the demo purpose, we are using Google’s Inceptionv3 as our model for recognizing images in an object.

Drag and drop the coreml model file to the Xcode project and create the Xcode generated model using Inceptionv3 class initializer.

Get an image from the device using UIImagePickerController and pass the converted CVPixelBuffer object of the image to our Inceptionv3 model for predicting the objects in the image.Please go through the below code.
guard let image = info["UIImagePickerControllerOriginalImage"] as? UIImage else {
           return
       } //1

       UIGraphicsBeginImageContextWithOptions(CGSize(width: 299, height: 299), true, 2.0)
       image.draw(in: CGRect(x: 0, y: 0, width: 299, height: 299))
       let newImage = UIGraphicsGetImageFromCurrentImageContext()!
       UIGraphicsEndImageContext()

       let attrs = [kCVPixelBufferCGImageCompatibilityKey: kCFBooleanTrue, kCVPixelBufferCGBitmapContextCompatibilityKey: kCFBooleanTrue] as CFDictionary
       var pixelBuffer : CVPixelBuffer?
       let status = CVPixelBufferCreate(kCFAllocatorDefault, Int(newImage.size.width), Int(newImage.size.height), kCVPixelFormatType_32ARGB, attrs, &pixelBuffer)
       guard (status == kCVReturnSuccess) else {
           return
       }

       CVPixelBufferLockBaseAddress(pixelBuffer!, CVPixelBufferLockFlags(rawValue: 0))
       let pixelData = CVPixelBufferGetBaseAddress(pixelBuffer!)

       let rgbColorSpace = CGColorSpaceCreateDeviceRGB()
       let context = CGContext(data: pixelData, width: Int(newImage.size.width), height: Int(newImage.size.height), bitsPerComponent: 8, bytesPerRow: CVPixelBufferGetBytesPerRow(pixelBuffer!), space: rgbColorSpace, bitmapInfo: CGImageAlphaInfo.noneSkipFirst.rawValue) //3

       context?.translateBy(x: 0, y: newImage.size.height)
       context?.scaleBy(x: 1.0, y: -1.0)

       UIGraphicsPushContext(context!)
       newImage.draw(in: CGRect(x: 0, y: 0, width: newImage.size.width, height: newImage.size.height))
       UIGraphicsPopContext()
       CVPixelBufferUnlockBaseAddress(pixelBuffer!, CVPixelBufferLockFlags(rawValue: 0))
       imageView.image = newImage

       // Core ML
       guard let prediction = try? model.prediction(image: pixelBuffer!) else {
           return
       }
The object named prediction contains the output values from the image input. The image below shows a sample image and the predicted result.


Now that you have learned how to build your first machine learning integrated iOS App, head on to Core ML and explore more of its features and experiment with how you can make better apps with it. The advantages of using Core ML are in plenty.
First of all, it is a creation of Apple’s own engineering team and hence support for the developer community will be immense and Apple is known to learn from feedbacks and continuously improve its developer tools and resources. Secondly, Core ML has been built on comparatively low-profile technologies like Accelerate and Metal thereby allowing it to efficiently operate with minimal resources. It can seamlessly utilize the GPU and CPU units to operate its processing engine. Data integrity or security is not compromised as Core ML allows you to run machine learning models on your device rather than take your device’s data onto a cloud based processing engine. But the most important aspect of Core ML that will make it more developer friendly is that to use Core ML, developers do not need to have expert knowledge about AI networks or machine learning to create processing models. There is an abundant supply of trained learning models already available for you to convert into Core ML models and you can even utilize the small but growing set of Core ML models available in the dedicated Core ML website hosted by Apple.
So there you go folks, all the information you need about Core ML and steps on how to build your very first machine learning powered iOS app. Core ML opens up a whole new area of programming for developers to explore. AI integration can unlock huge possibilities in existing apps like the inclusion of speech analysis, computer vision, natural language processing, auto responses and much more. The door is open wide and you are free to explore the limitless possibilities. Let us know about your experiences with machine learning or if you would love to explore the possibilities together with us.
Get in touch with our expert AI consultants today to know more.